
This playbook covers the marketing and the homeowner conversation. If you'd like the campaigns run for you, see our roofing marketing agency. Here's the plan I'd put in place first.
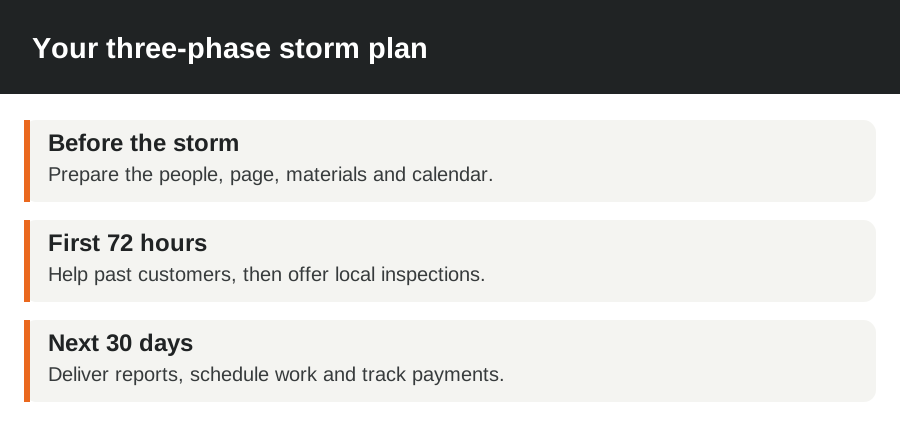
The storm plan (3-phase timeline)
| Phase | What you'll do | What you'll measure |
|---|---|---|
| Before the storm | Prepare your storm-help page, customer contacts, partners, printed materials and inspection calendar | Available inspection slots and installation capacity |
| First 72 hours | Help past customers first, work nearby streets and run a small local inspection campaign | Replies, inspections booked and inspections attended |
| Next 30 days | Deliver photo reports, send repair estimates and keep homeowners updated | Signed jobs, production dates and payments collected |
Don't count every inquiry as a roof. A booked inspection, a claim decision and a signed job are different steps. Your office should be able to tell you which step each homeowner's at without asking three salespeople.
Before the storm
Build one storm-help page people can actually use. Put your service area, contact route and inspection process near the top. Explain what the homeowner gets: a roof condition report with dated photos and a repair recommendation. Show your own crew and completed local work with permission.
Then get the basics ready:
- A past-customer list with the right service addresses and contact preferences. Use permission-based texts and calls, and honor stop requests.
- A named person who'll answer inquiries and own the inspection calendar when your reps are out.
- Door hangers and yard signs that match the inspection offer on your website.
- A short partner list: insurance agents, realtors and property managers who know your work.
- A weather alert routine and a map of the places you can serve.
- A crew plan with booked roofs, material availability and room for weather delays.
Check your towns' licensing, solicitor permits, no-knock lists and sign rules before sending anyone out. You'll move faster after a storm if you've already done that work.
Weather reports help you choose where to look; they don't prove a particular roof was damaged. Your inspection does that. Don't load a neighborhood into a campaign just because it appears inside a hail map.
Partners need a useful service before they need a sales pitch. Tell a property manager who'll answer a leak call and what your report includes. Send an agent a sample roof condition report with customer details removed. You're making it easy for them to introduce a contractor they'll feel comfortable recommending.
The first 72 hours
I'd work in this order once it's safe to travel and inspect:
- Past customers and partners. Ask whether they've noticed leaks or visible damage. Give urgent water-entry calls a clear route to your office.
- Streets around jobs you're already doing. Ask customers before using their property as a reference. Local proof beats a vague claim that you're working everywhere.
- Short local ads. Offer a photo report in the areas your inspectors can reach. Name the next available appointment window honestly.
- Permitted door knocking. Introduce yourself, explain the local reason you're there and ask a simple question. See door knocking for roofers for openers and appointment steps.
Keep inspection appointments separate from installation dates. Your rep may have a free afternoon while your crews are booked for weeks. The homeowner needs both pieces of information before they decide.
Two post-storm ad examples
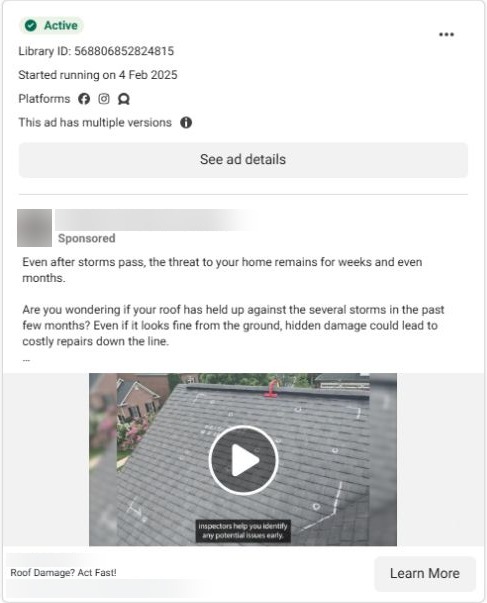
Example ad. Source: Meta Ads Library. Captured 28 October 2026.
What it does well: it connects recent storms to a practical question about roof condition. The roof inspection image supports the message. I'd make the photo report and booking step the center of your own version, with a local service area.
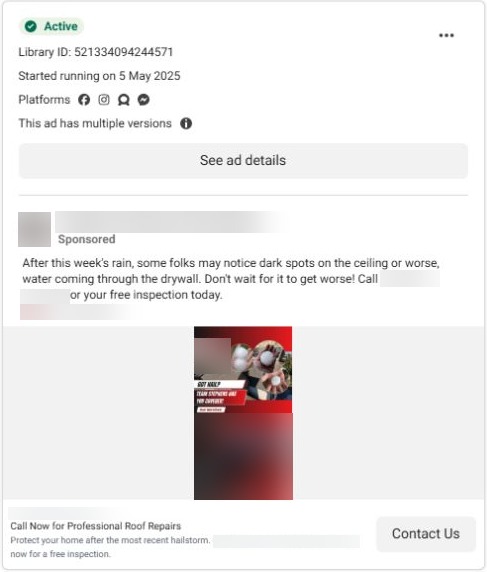
Example ad. Source: Meta Ads Library. Captured 28 October 2026.
What it does well: it names something a homeowner can recognize, such as a ceiling mark, then offers an inspection. I'd give people with active leaks a direct call route and tell everyone else what the inspection includes. Your own offer should match the help you can deliver.
For campaign setup, see Facebook ads for roofers. If you'd like local storm campaigns run and followed up for you, sized to your inspection slots, see roofing lead generation. Keep the same town, offer and next step on the ad and the page it opens.
Explaining claim money to homeowners (handout)
Give the homeowner a simple money map. They're often trying to understand why the first payment is smaller than the repair estimate. Don't let that surprise land after you've ordered materials.
Print the roof claim money handout. It's a one-page explanation you can share alongside your inspection report.
| Term | Plain explanation |
|---|---|
| Replacement cost | The cost to replace the covered damaged roof with comparable materials |
| Actual cash value, or ACV | Its value after the policy's allowance for age and condition, called depreciation |
| Deductible | The part the homeowner pays under the policy |
| Recoverable depreciation | Money held back that may be released after eligible repairs and the required proof |
Think of an older car: the value of the used car isn't the price of a new one. A roof can have the same gap between its depreciated value and replacement cost. The policy tells the homeowner which payment basis applies.
Example: a covered replacement is priced at $14,000, depreciation is $3,500 and the deductible is $2,500. ACV is $10,500. The first payment is $8,000 after the deductible. If all $3,500 of depreciation is recoverable and the policy's repair requirements are met, the insurance payments total $11,500. The homeowner's $2,500 makes up the $14,000 price.
Some policies pay ACV only or use a roof payment schedule, so that later depreciation payment won't always exist. Upgrades and uncovered work can add to the homeowner's share. Send policy-specific questions to their insurer or agent, and keep your conversation about the actual roof and repair price.
Ask about payment handling early, too. A mortgage company may be named on a payment and have its own release process. You'll want to know that before promising a material order or production date. Your office should explain the invoice stages and the documents it'll provide when the work's done.
What homeowners should know (and you can say)
Be the contractor who makes the process easier to understand. Tell the homeowner:
- Their insurer decides whether the claim's covered and what it pays.
- They can choose their contractor and take time to understand the scope.
- If they're unsure about signing before a claim decision, they can wait and ask questions.
- They should keep the inspection photos, estimates, letters and receipts together.
- If damage appears to have been missed, they can ask their insurer how to request another inspection or review.
You can say, “We'll show you what we found and price the repair work. What would you like us to explain about the roof?” That's a more useful conversation than guessing what a policy will pay.
If your inspection finds wear rather than storm damage, say so. Give a repair or replacement estimate based on the roof's condition. Don't push the homeowner toward a claim just to keep a sale moving. A straightforward retail option is better than an insurance argument your photos don't support.
Inspections and the adjuster meeting
Take a wide shot that locates each area, then close-ups that show what you're describing. Date the report. Separate observed damage, existing wear and anything you couldn't safely inspect. Record the roof measurements, materials and proposed repair scope so another person can follow your reasoning.
If the homeowner wants you at the adjuster's visit, bring that report and answer questions about the roof and your estimate. “Here's the damaged flashing and the repair item it relates to” is useful.
When a repair item is missing, document it with photos, measurements and the relevant building requirement, then provide the repair information through the insurer's stated process. The homeowner handles coverage questions. Don't use a broad claim about matching rules as a shortcut around showing the actual condition and repair requirement.
Finish the visit with a next step your office can track: report sent, repair estimate due, homeowner waiting for the insurer, or production ready to schedule. If you're waiting, give the homeowner a named contact and a sensible update date. They shouldn't have to retell the whole story each time they call.
Stay legal: what you can't promise (table)
Check your state's rules on contractors and insurance claims before you use a storm script or contract. Texas, for instance, bars a roofer from acting as the public adjuster on a property where they also do the work.
| Skip this promise or practice | Say or do this instead |
|---|---|
| A deductible rebate offer | Don't offer to pay, waive or rebate the deductible; it's illegal in many states. |
| A higher invoice hiding a discount | Invoice the real work at its real price; inflating an invoice to conceal the homeowner's share is fraud. |
| “You're approved for a free roof” | Offer an inspection report and a repair estimate, with a clear price. |
| “We'll negotiate your insurance settlement” | Explain your repair scope and leave claim representation to the proper licensed role. |
| Pressure to sign before they've understood the job | Give an itemized scope, payment stages and the cancellation rights their contract requires. |
Keep emergency protection separate from a full replacement decision. A homeowner who needs help keeping rain out shouldn't feel pushed into signing for an entire roof. Explain the immediate work and its price so they can choose it on its own merits.
Capacity: when to stop marketing
Start with crews x roofs per crew per week x weeks left. Then subtract work already booked and a weather allowance. That's the number that matters when you're deciding whether to buy more inquiries.
Use the storm capacity calculator.
With 2 crews each doing 3 roofs a week and 10 weeks left, you've got capacity for 60 roofs before other commitments. If 24 are booked and you reserve room for 6 more for weather and rescheduling, you've got 30 roofs left to sell. Use your own production pace, roof types and local season dates.
Stop paid acquisition when the remaining work you can take is filled. Keep answering existing customers and offer an honest waitlist if you expect openings. Don't keep an ad promising this week's appointments when the next visit is weeks away.
Check two limits each morning: inspection slots and installation capacity. Pause the relevant campaign if either one is full. If the weather changes the schedule, tell booked homeowners first. Your calendar is a better campaign limit than an ambitious sales target.
You'll also need money for materials and payroll while claims move through payment stages. Compare the expected payment dates with what you'll owe suppliers. A full order book won't help if you've committed to more jobs than you can fund and finish.
After the season
Send the completed-job photo report and close out the paperwork. Ask customers for an honest review and make it easy to refer a neighbor. Thank partners for the introduction and let them know the work's finished without sharing private claim details.
Use yard signs and door hangers while the local work's visible, then take them down when permission ends. Your estimate follow-up process should separate people waiting for an insurer from people ready to choose a retail quote.
Don't build the whole business around the next hailstorm. Keep your local search pages useful, serve repair customers and build referral partnerships. The complete roofing marketing guide shows how storm response fits alongside year-round sources of work.
Want the local campaigns run for you?
Our roofing marketing agency can run local campaigns and booking follow-up sized to your crews. Packages start from $297/month, with ad spend separate and paid directly to the platform. You handle inspections and insurance-related job paperwork; we handle the marketing and follow-up until the lead books.
Tell us your area and the work you want, and we'll show you the first 30 days we'd run.
FAQ
How do roofers get insurance jobs?
Start with past customers and trusted local partners, then offer documented inspections in the neighborhoods you can serve. Use short local campaigns and nearby job-site outreach once you've got room in the calendar. You'll win the work by showing the roof's condition, explaining the repair and keeping the homeowner updated.
Can a roofer pay my deductible?
No. The deductible is the homeowner's share, as the money table above shows. Build your payment conversation around the actual contract price and the insurer's payment stages, so everyone's clear about who pays what.
What happens at the adjuster meeting?
The adjuster inspects the damage for the insurer. If the homeowner invites you, bring your dated photos and repair estimate, point out the physical findings and answer questions about the work. Leave with a clear record of what you'll send next and who's waiting for which document.
How long does a roof claim take?
Allow several weeks for the claim decision; a concrete Texas example is 15 business days after the insurer has the information it needs, with a possible 45-day extension and extra catastrophe time. Inspection queues, missing documents and disputes can stretch the process. Ask the insurer for the next action date, and schedule installation separately from the claim decision.
What if the claim is denied?
Ask for the reason, then compare it with the inspection evidence. The homeowner can ask the insurer about a review or re-inspection if something was missed. Supply accurate roof documentation and a retail repair option where useful. Coverage disputes go back to the insurer, the state insurance department or the homeowner's chosen licensed representative.